Latest »
2011-03-13:
ShapeUp v2.0.00 RC 3 available read more
2009-03-01:
New plug-in for vector data optimizations available read more
ShapeUp FAQ »
Adding dataEditing data
Saving data
Data generation
- Is there any support for generating HTML pages/snippets?
- What is the Attribute List Builder?
- How can I generate a text file in a custom format?
Developer questions
- How do I debug my plug-ins using Visual Studio?
- When I deploy my plug-in on another machine, it complains about missing DLL files.
Adding data
Q: How can I add data to ShapeUp?
A: There are many ways to load data into ShapeUp. The Insert menu is normally where to start. From this menu you can open shape files or bitmaps using the Add Theme menu item. Data formats not directly supported by ShapeUp might have a loader plug-in associated with it. Loader plug-ins can be invoked from the Add Theme From sub menu, where all valid loader plug-ins are listed. Layers may also be imported from ShapeUp workspace files (*.sup) through the Import From Workspace File menu item. All layers in the selected workspace are imported into the current worksapce. New empty layers can also be created from the Insert|New Theme sub menues.
Shape files and image files can be added by using drag&drop from windows explorer.
It is also possible to load data using JavaScript.
Q: What data formats are supported?
A: ShapeUp without any extensions supports ESRI shape file format for vector data, and various image formats for raster data. However, ShapeUp is created to support any vector format using loader plug-ins. A loader plug-in is an extension to ShapeUp which gives a developer full control over the loading process. ShapeUp comes with a few loader plug-ins such as the Text Point Loader to read point data from text files, and two others to support MapInfo map/tab and mif/mid formats.
More information on loader plug-ins can be found under Developer and Resources & Samples.
Editing data
Q: All editing functions are disabled. What's wrong?
A: ShapeUp defaults to keeping all loaded themes in a read-only state. To enable editing, select the theme and from the Theme menu select Enable Editing.
A pen symbol is shown in the legend view if a theme is in an editable state.
Saving data
Q: When and how is data saved?
A: The entire workspace can be saved using Save Workspace from the File menu. Depending on the state of each theme, data is saved somewhat different.
If a theme is in edit mode (the pen symbol is shown in legend view) the entire themes data is always written to the workspace file.
If the themes data source is a shape file or image file, only the path to that file is saved i the worksapce file. If the themes data source is a loader plug-in, data stored depends on whether the plug-in supports serialization or not. If it does, it's up to the plug-in to store whatever information is needed to recreate that theme. If it doesn't, the theme is converted to ShapeUp native format, wich currently means that the layer is made enabled for editing, and then the entire theme data is stored in the workspace file.
Important: A theme that has been enabled for editing is thus always saved in the workspace file, even if the data source was e.g. a shape file. The only way to write modified data back to the original source is to use the Export mechanism. This is by design to protect data from being modified by mistake.
Q: How can I save a layer to a shape file?
A: Select the layer to save and from the Theme menu select Export. Pick the format you want, in this case Shape, and hit OK and give the name of the file (.shp). In the next step, make sure you check the boxes for index and attribute files, and you're done.
Data generation
Q: Is there any support for generating HTML pages/snippets?
A: The answer is yes. There are many ways to create HTML that can be used on web pages.
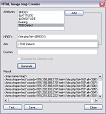
The most direct support is when saving a map as a single image from the File menu. After the image is saved, the user is asked if a HTML image map should be created for that image. The user can then select what theme should be used as a base for the image map, and the code is generated directly as an HTML <MAP> element with <AREA> tags for each object in the layer.
To generate data to be displayed as HTML, there is a simple and yet powerful tool called Attribute List Builder found under the Edit menu. There is a separate section in this FAQ describing the Attribute List Builder, since it can be used for a lot more than generating HTML.
JavaScript and exporter plug-ins can also be used in ShapeUp to generate any HTML code needed.
Q: What is the Attribute List Builder?
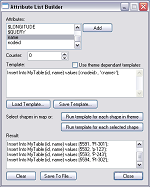
A: The Attribute List Builder (ALB) is a powerful tool to generate text output from data in ShapeUp. It is invoked from the Edit menu.
The ALB uses templates to generate its output. Once a template is defined, the ALB can generate output for all objects, or for all selected objets. For each object, the template is translated and added to the output. The ALB also works in single select mode, where it will respond to selection in the geographic view. If an object is selected, the template will be translated for that object and the result added to the output.
How do one create a good template? Let's demonstrate this with a few examples. In the examples, let's assume we have a point layer loaded which has two attributes, 'nodeid' and 'name'.
Example 1. We want to create an SQL script to insert our point layer into a database. Let's look at an SQL insert statement:
Insert Into MyTable (id, name) values (1, 'A name');
This is a valid statement for most databases. The only trouble is that we want different values for different objects. Well, thats why we call it a template. Now look at the following.
Insert Into MyTable (id, name) values (<nodeid>, '<name>');
When ALB sees this template it will translate it differently for each object. The parts of the template ALB doesn't recognise is kept untouched. The variables vary from theme to theme, depending on type of data and its associated attributes. All available variables are always listed in the top list box in ALB. Double-clicking a list item, or selecting one and pushing the Add button will insert that variable name into the template at the current cursor position. In the example above, it is a good idea to enter a new-line after the template, to get each statement on a separate line in the output.
Example 2. We want to create a comma separated list of node ids over a path we choose. The simple template might look like
<nodeid>,
Now, move tha ALB aside, and start selecting one point at a time in the geographic view along the path, and see the output grow for each selection. If the ALB is minimized, it will still receive selections. To temporarily halt this behaviour, close the ALB. Now it will not receive selections, but all data are kept until you open the dialog again.
Q: How can I generate a text file in a custom format?
A: For simple data generation check the What is the Attribute List Builder? entry above.
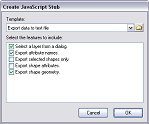
To fully customize a text file output, you can use JavaScript. To get started, from the Tools menu, select JavaScript Creator... In the next step you will be able to select a JavaScript template to start with. Select 'Export data to text file' from the drop down menu. In the checkboxes that appear, select the basic features you would like to include in your script, and click OK. You will now be prompted for a place to save the script file. Edit the file to suite your needs. If you have any problems you can ask for assistance on the forum, or send an e-mail to the support.
There are a few different ways to run your script.
- Start the ShapeUp console from the View menu, and start your script using the run command.
- Use the Script toolbar and bind a button to your script file and start it with a click. Binding a button to a script is straigt forward. If a button is currently unbound, just click it to bind it to a file. If it is bound, click the drop down arrow, and select Bind....
- Save the script under the <ShapeUp>/Tools subdirectory. It can then be run from the Tools | JavaScript menu in ShapeUp.
Developer questions
Q: How do I debug my plug-ins using Visual Studio?
A: The easiest way to debug you plug-in, is to set-up the environment to put the debug-built plug-in file directly into <ShapeUp dir>/Plugins directory. Then start debugging from the IDE, and when prompted for an executable file, select <ShapeUp dir>/ShapeUp.exe. You can now debug your code in a normal fashion using breakpoints or whatever.
Other options are to use DebugBreak() and OutputDebugString() WIN32 API functions directly in your code.
Q: When I deploy my plug-in on another machine, it complains about missing DLL files.
A: An easy mistake to make is to deploy a plug-in built in debug mode. This demands special dll-files to be present on the target machine. Dll-files that are not redistributable. So this will only work on a target machine with the Visual Studio environment installed. One indication of this is that the requested dll might contain an extra character, d, in its name, like MSVCRTD.DLL instead of the release version MSVCRT.DLL. Make sure you deploy a release-built plug-in.